Knowledge Base Tapo Camera Day/Night Mode Selection Guide: Best Settings Recommendations for Different Scenarios

In modern home security, a camera's imaging capability relies not only on its hardware and firmware configuration but also on its intelligent adaptation to environmental lighting conditions. Tapo smart cameras automatically adjust their imaging modes based on ambient light, ensuring clear images and visible details. From high-definition color footage during the day to infrared or full-color night vision at night, Tapo offers various visual solutions to meet diverse security needs.
This article will explore the characteristics and application scenarios of these operating modes on Tapo cameras, helping users make informed settings based on their specific requirements.
Part 1: Introduction to Video Modes on Tapo Cameras
In the Live View page of your Tapo Camera, you can select from Auto Mode, Day Mode, or Night Mode.
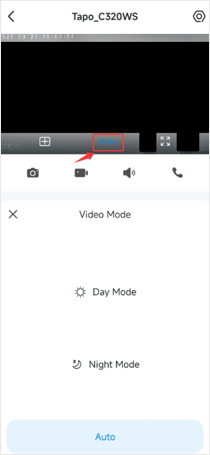
Auto Mode: The Tapo Camera automatically switches between Day and Night modes based on the ambient lighting conditions.
Day Mode: The Tapo Camera displays colorful images in well-lit environments. However, in low light or darkness, the image may not be clear or could appear black.
Night Mode:
- For models without a Spotlight or Floodlight, the infrared light activates, displaying a black-and-white image regardless of ambient light.
- For models equipped with a Spotlight or Floodlight, settings can be customized in the Device Settings > Video & Display > Night Mode Settings.
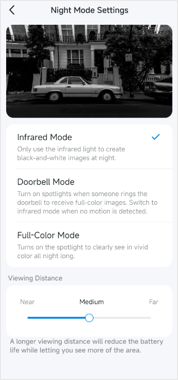
Night Mode Settings
The various operating modes on the Night Mode Settings page are described as follows.
Note:
- The following operating modes take effect only when the camera works in Night Mode
- The available operating modes may vary by camera model.
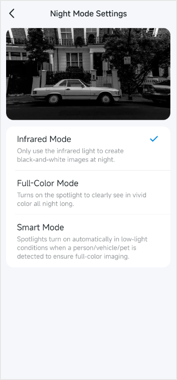
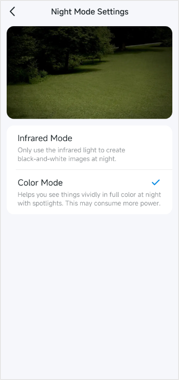
1) Infrared Mode: The camera activates the infrared light and displays a black-and-white image regardless of the ambient lighting conditions.
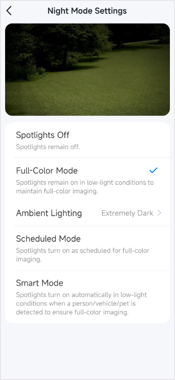
2) Smart Mode: The camera will turn on the spotlight temporarily when it detects an event, ensuring full-color imaging.
3) Full-Color Mode: The camera will turn on the spotlights for vivid color images at night. Note that battery-powered cameras will enter sleep mode to conserve battery when no events are detected and app access, turning off the spotlight until the camera is awakened.
4) Doorbell Mode: The doorbell camera will activate the spotlights when someone rings the doorbell, allowing for full-color images. It will then switch to Infrared Mode when no motion is detected.
5) Spotlight Off: The spotlight remains off regardless of ambient light conditions, allowing the camera to produce colorful images without additional lighting.
6) Schedule Mode: The spotlight turns on as scheduled for full-color imaging.
The following images show several different Night Mode Settings pages.
Part 2: Best Settings Recommendations for Typical Scenarios
Scenario 1: Capture full-color images during the day and switch to Night Mode at night, then activate the spotlights upon detecting an event to capture full-color images
Case 1: Tapo camera models that powered through DC power adapter/electric wires/PoE
- Set Video Mode to Auto on the Live View page.
- In Night Mode Settings, select Smart Mode.
This setting allows the camera to switch between Day and Night Modes automatically. During the day, it captures full-color images, and at night, it activates spotlights upon detecting an event for full-color footage. When no event is detected, it switches to Infrared Mode, showing black-and-white images.
Case 2: Battery-Powered camera models
- Set Video Mode to Auto on the Live View page.
- In Night Mode Settings, select Full-Color Mode. (Note: The battery-powered cameras do not have the Smart Mode option)
Similar to Case 1, the camera switches between Day and Night modes based on ambient light. However, the settings may not fully meet the requirements of Scenario 1. When awakened by an event or app access, the camera will turn on the spotlight for full-color images, and it will turn off the spotlight when entering sleep mode.
Scenario 2: Display full-color images both day and night
Case 1: Tapo camera models that powered through DC power adapter/electric wires/PoE
- Set Video Mode to Auto and select Full-Color Mode in Night Mode Settings.
This setting allows the camera to switch between Day and Night Modes automatically. During the day, it captures full-color images, and at night, it will continuously keep the spotlights on to capture full-color images.
Case 2: Battery-Powered camera models
- Set Video Mode to Auto and select Full-Color Mode in Night Mode Settings.
Similar to Case 1, the camera switches between Day and Night modes based on ambient light. However, the camera only turns on the spotlight for full-color images when awakened by an event or app access. It will turn off the spotlight when entering sleep mode.
Scenario 3: Capture full-color images at night only when the doorbell rings
For the Tapo doorbell cameras:
- Set Video Mode to Auto and select Doorbell Mode in Night Mode Settings.
The camera will switch between Day and Night Modes automatically. At night, it activates the spotlights to capture full-color images when the doorbell rings. If no one rings the doorbell but an event is detected, it switches to Infrared Mode, displaying black-and-white images. Battery-powered models will enter sleep mode if no events are detected and app access.
More Articles:
How to configure the Spotlight Settings of the Tapo cameras
Starlight Night Vision: higher-quality image in low-light conditions