Configuration Guide How to Configure IP Phone (VoIP) via Omada Switch and Omada Controller (based on version 6.0)

1. Background
IP Phones (VoIP) are widely adopted in office environments due to their low cost, flexible deployment, and easy scalability. To ensure efficient operation, network switches need to provide enhanced features and configurations that enable fast deployment and stable VoIP performance.
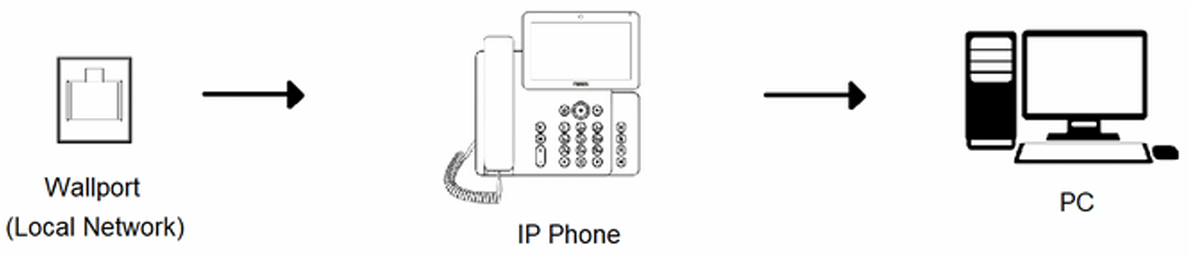
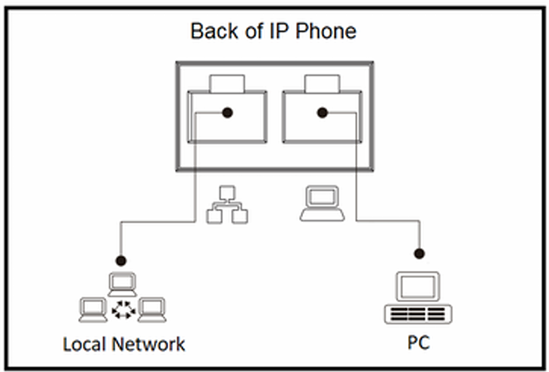
In many office setups, each workstation is equipped with two RJ45 wall ports — one for a PC connection and the other for an IP phone. In other cases, workstations may have only a single RJ45 wall port. In such scenarios, IP phones with dual RJ45 ports (as shown below) are used: one port connects to the network, while the other connects to the office PC. This design simplifies network deployment and reduces cabling complexity.
2. Features Demand
To ensure the rapid deployment and reliable operation of IP Phones (VoIP), specific network features must be supported and properly configured. These features optimize voice traffic handling, automate provisioning, and enhance overall network stability.
- LLDP-MED: An extension of LLDP that enables the exchange of VLAN and other network parameters between devices—particularly between IP phones and switches—allowing voice traffic to be carried on a dedicated VLAN.
- OUI-Based VLAN: Automatically assigns devices to the appropriate VLAN based on their Organizationally Unique Identifier (OUI) within the MAC address, ensuring that IP phone traffic is transmitted within the correct VLAN.
- QoS (Quality of Service): Prioritizes voice traffic over other types of network data, ensuring low latency and stable call quality for IP phone communications.
- DHCP Options (Option 66/150 and Custom Options): Delivers configuration file locations and SIP server information to IP phones through DHCP messages, enabling automatic, large-scale provisioning and simplified deployment.
- Legal DHCP Server Protection: Prevents unauthorized or rogue DHCP servers from assigning incorrect network parameters to IP phones, thereby maintaining proper configuration and network security.
Note: All SG2xxx/SG3xxx and above switch support these features.
3. Configure IP Phone (VoIP)
Considering the network topology and whether the IP phones support LLDP-MED, two configuration options are available:
Option 1 – Voice Network: Recommended for IP Phones that support LLDP-MED and/or have two RJ45 ports—one for connecting the PC and one for network uplink.
Option 2 – OUI-Based VLAN: Used when IP Phones do not support LLDP-MED, enabling automatic VLAN assignment based on the device’s MAC address (OUI).
Option 1: Voice Network
Network Plan: Switch port 1~4 connect IP Phone, and IP Phone downlink with PC.
Configuration:
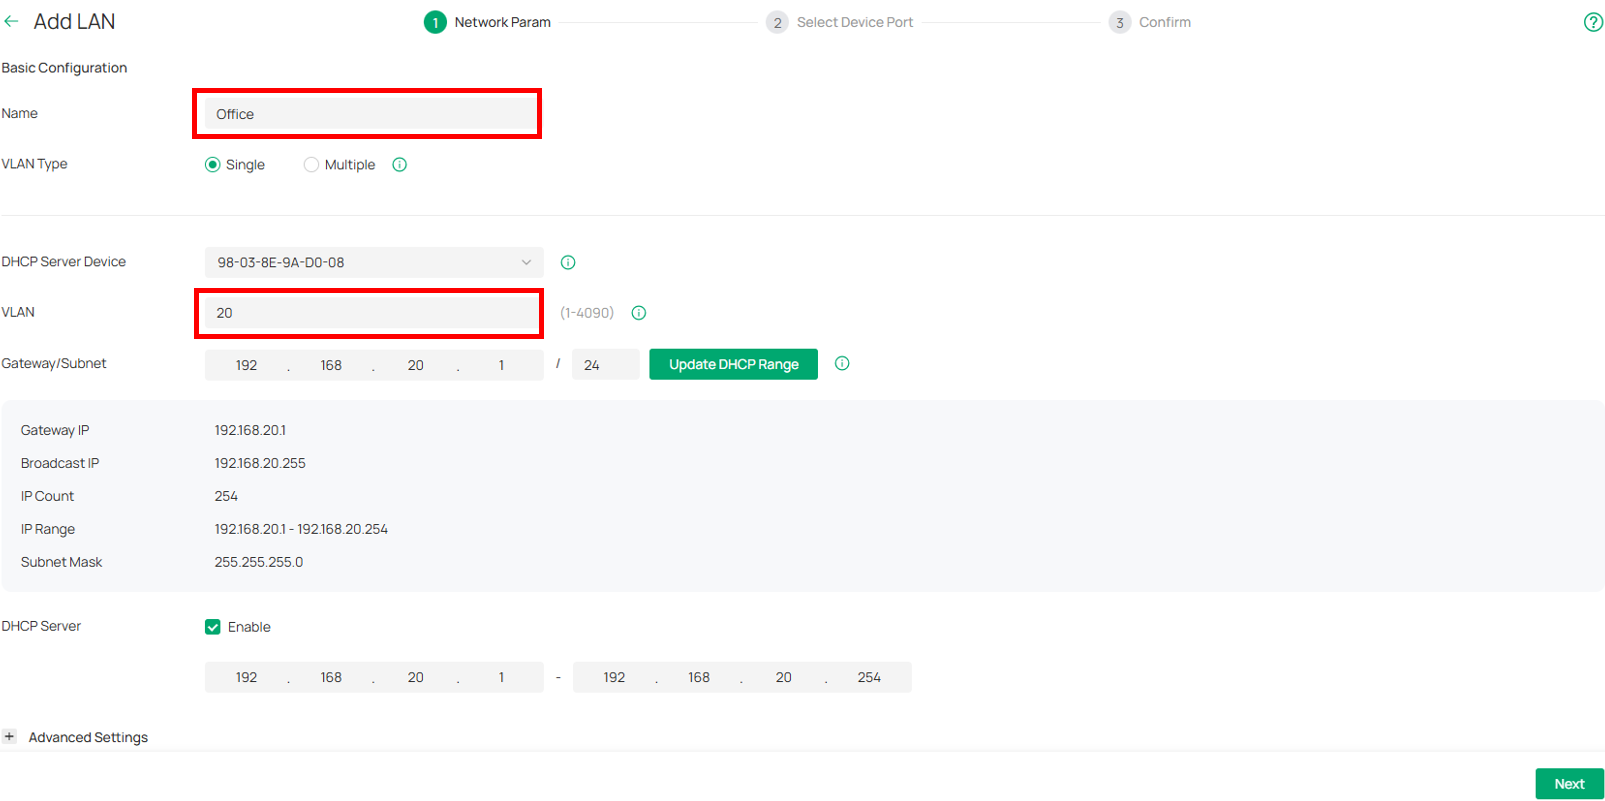
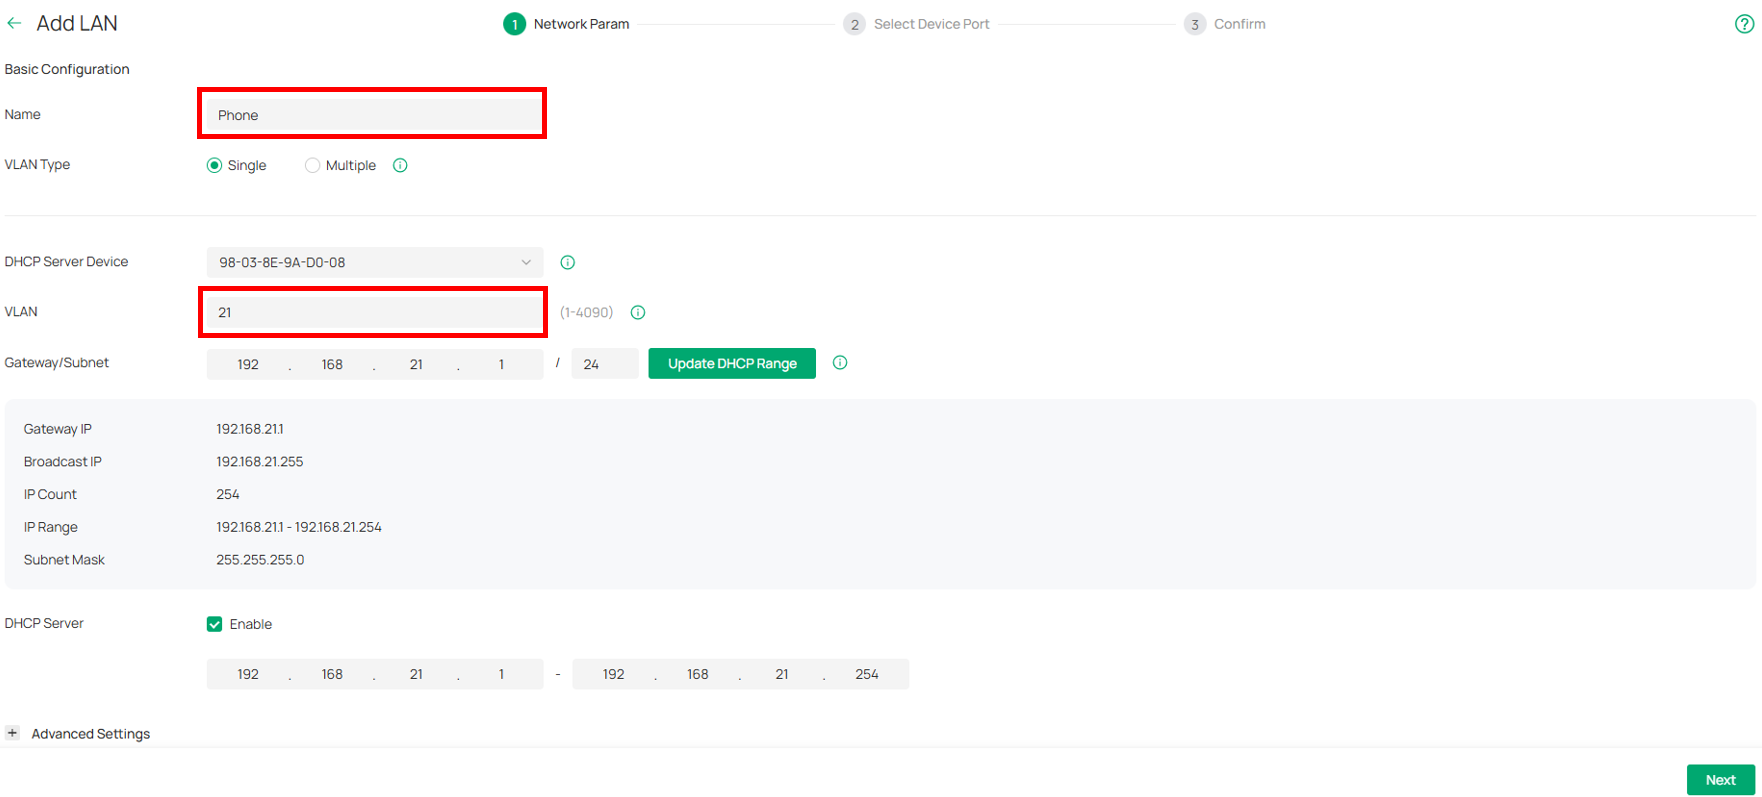
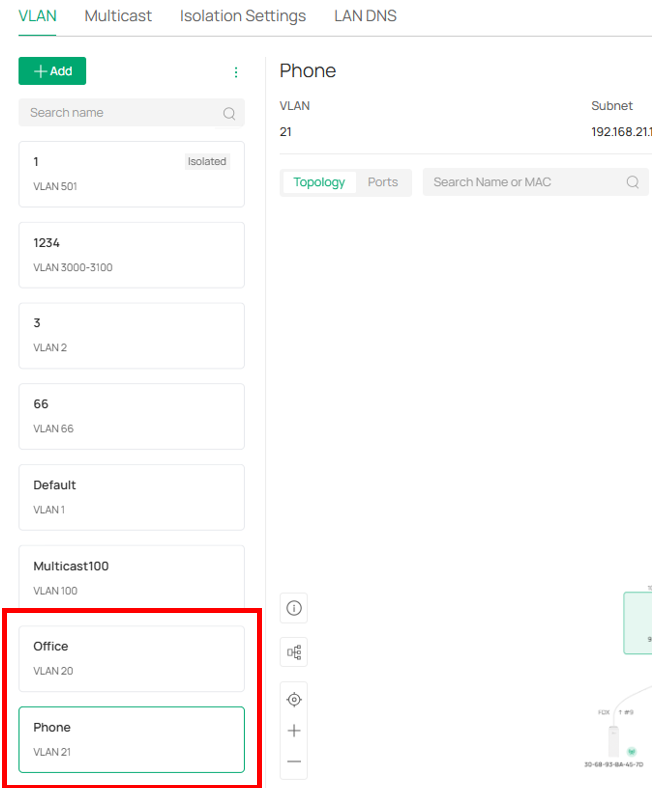
⑴ Navigate to Network Config → Network Settings → LAN, Create VLAN 20 named Office.
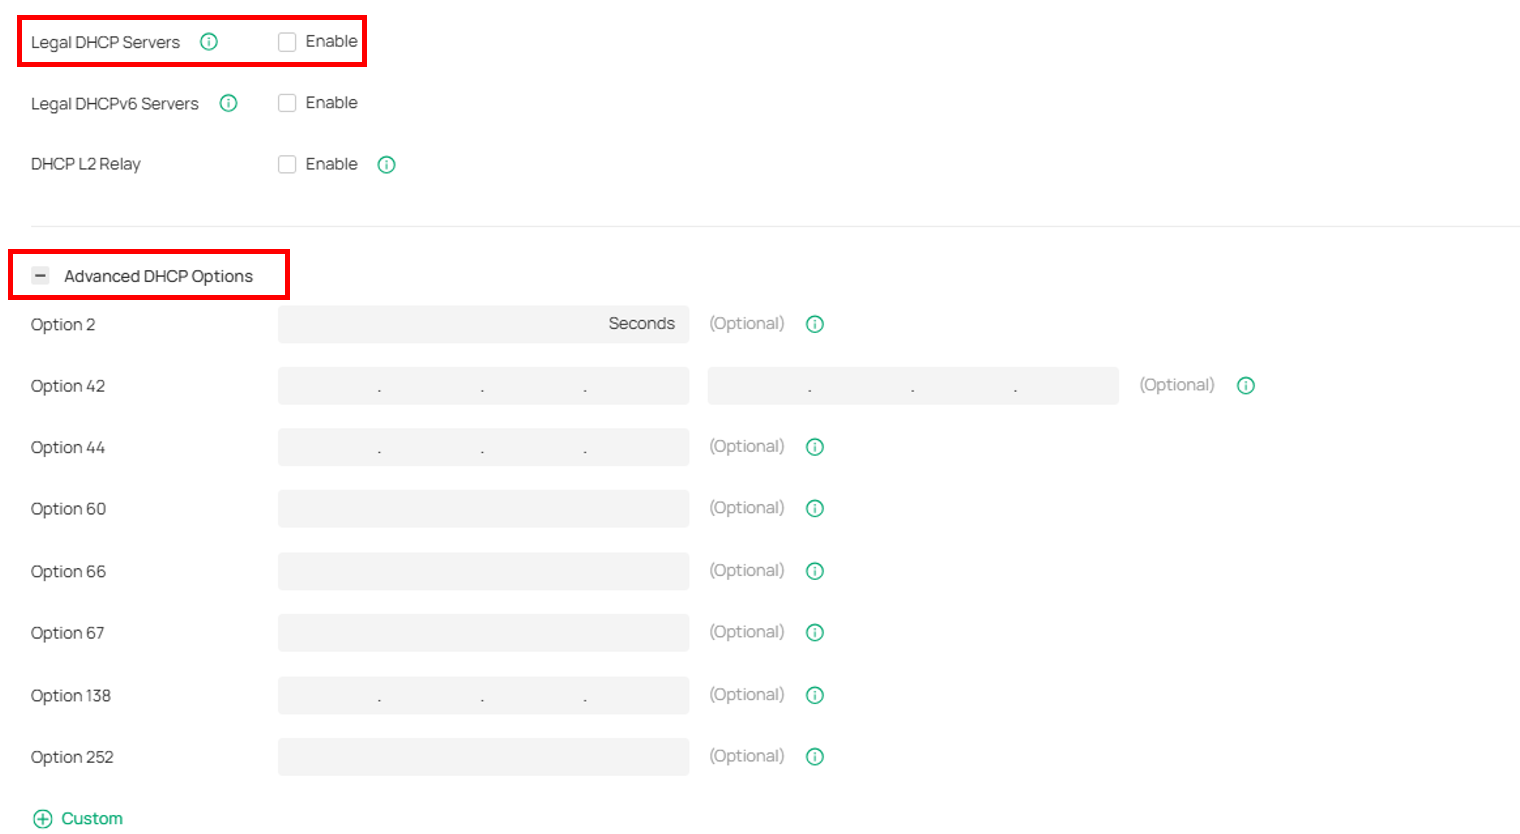
(Optional) Config Legal DHCP Server, DHCP Option.
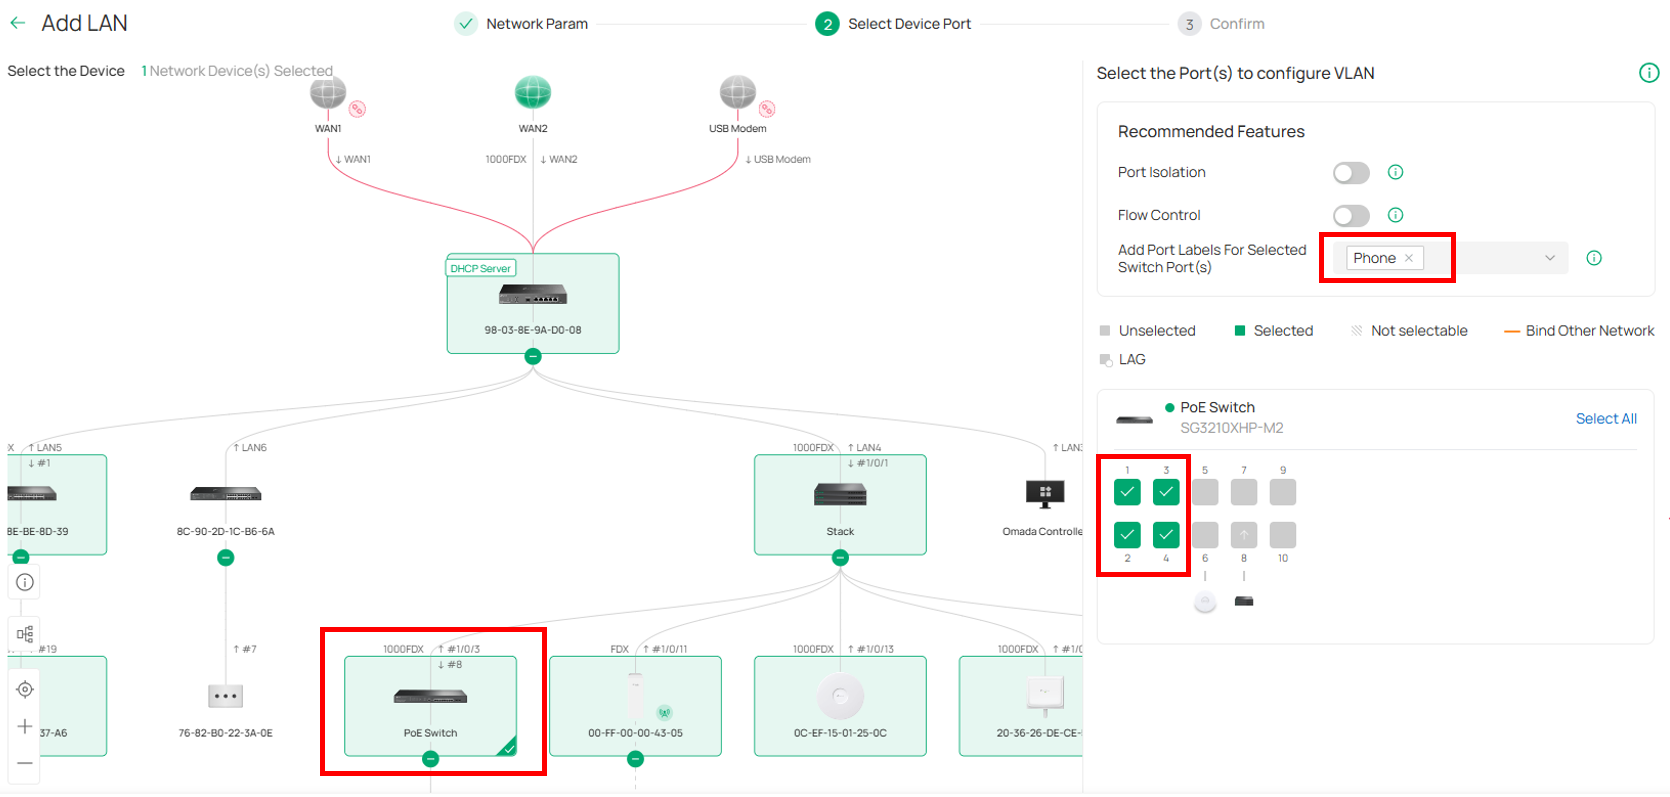
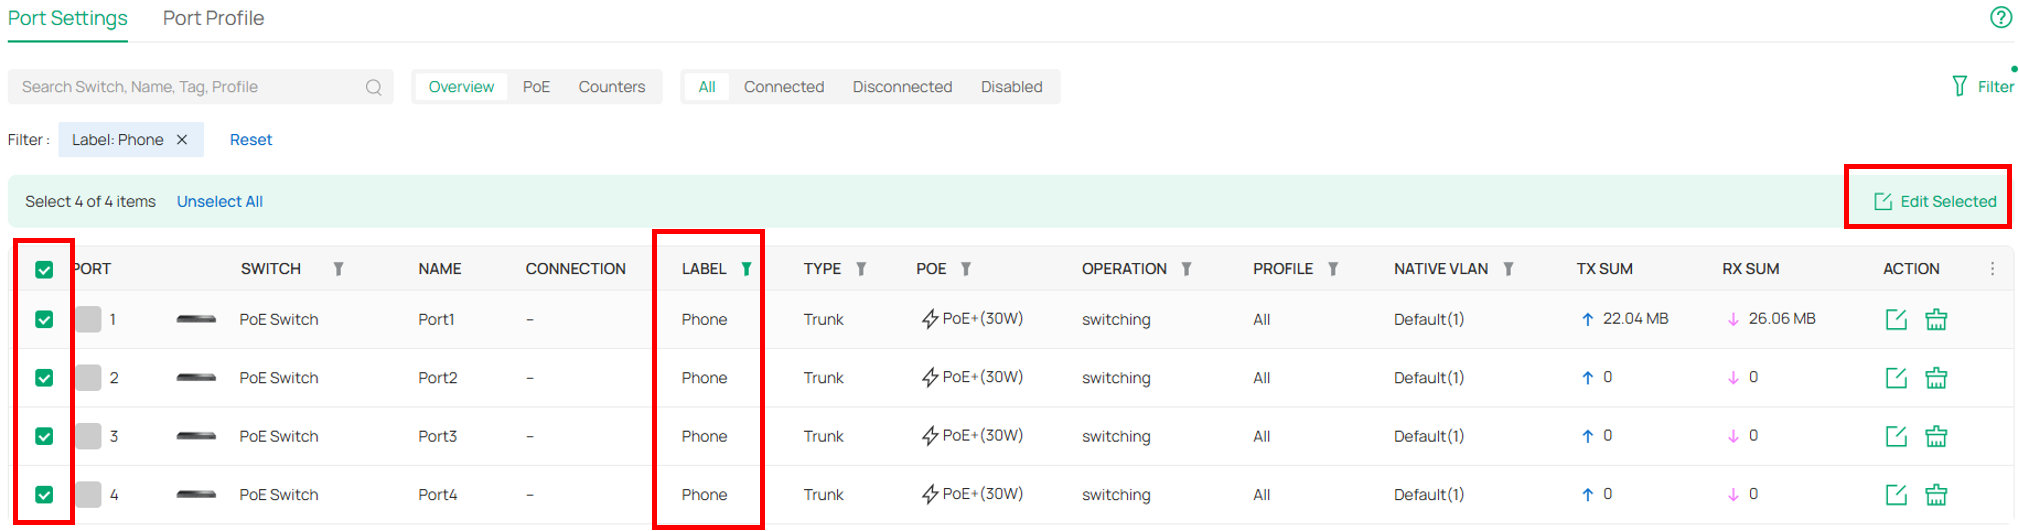
Select switch port 1~4 and add port tag, such as “Phone”, Click Next and Apply.
⑵ Navigate to Network Config → Network Settings → LAN, Create VLAN 21 named Phone.
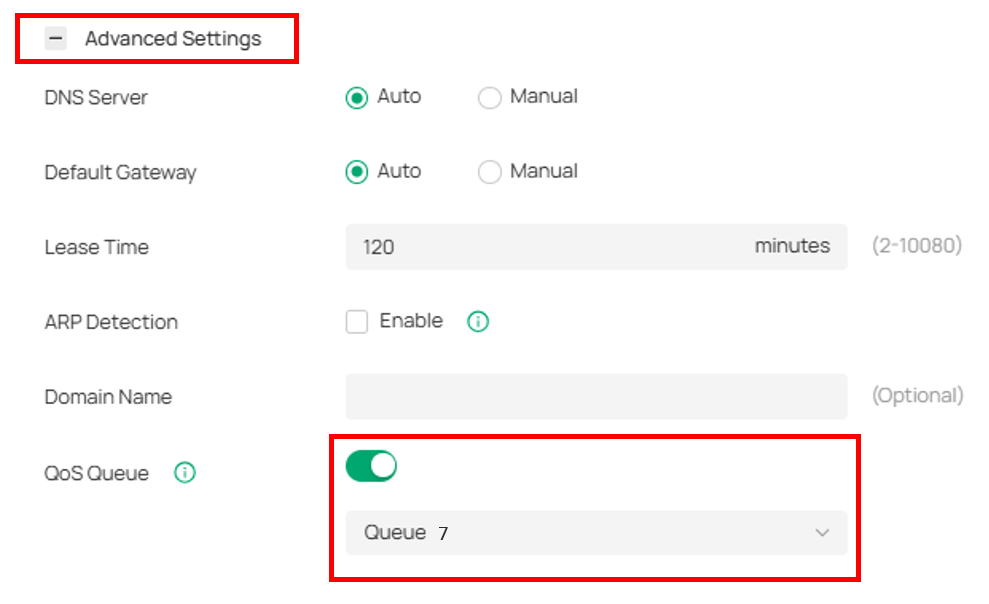
Config QoS Queue to provides priority assurance, normally select Queue 7
Skip select ports and Apply. Then we have completed basic VLAN config for both VLAN20 and VLAN21.
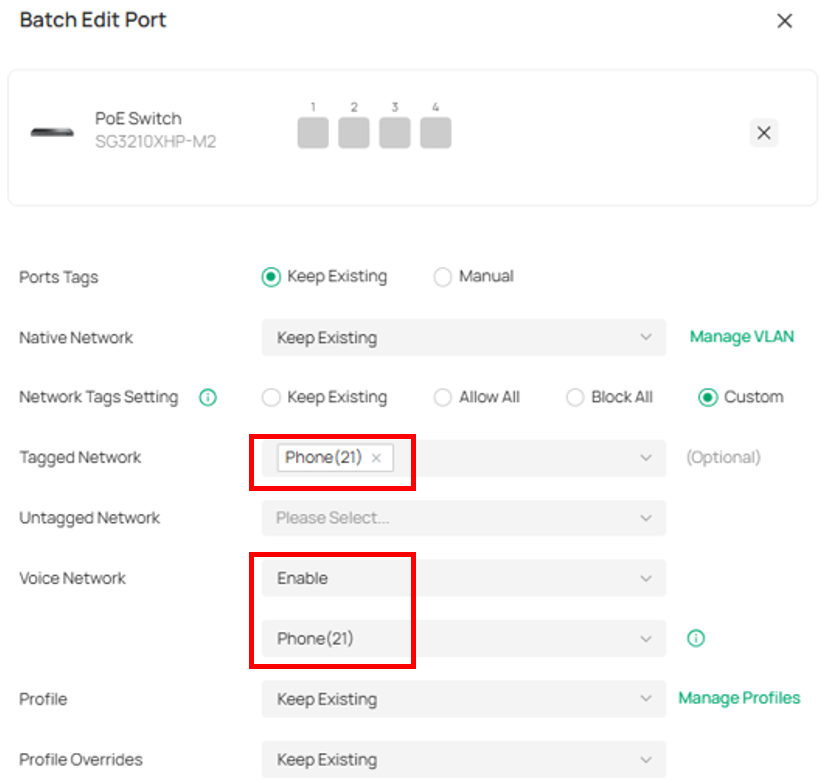
⑶ Config Voice Network. Navigate to Device Config → Switch → Switch Ports, Select “Phone” port and edit.
Edit Tagged Network to “Phone (21)”. Edit Voice Network to “Phone (21)”. LLDP-MED will be enabled automatically.
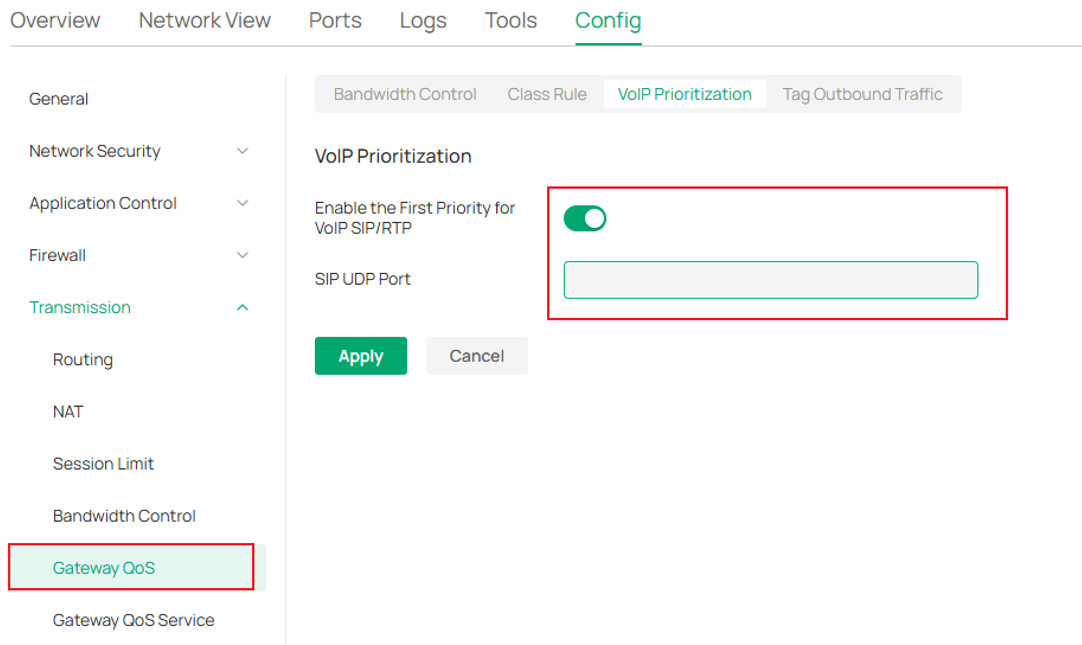
⑷ (Optional) Config Gateway——only necessary when the customer's voice traffic passes through the gateway.
Navigate to Device, pick up gateway, go to Manage Device → Config → Transmission → Gateway QoS → VoIP Prioritization, Enable the first priority for VoIP SIP/RTP.
Option 2: OUI-Based VLAN
Network Plan: Switch port 1~4 connect IP Phone.
Configuration:
⑴ Navigate to Network Config → Network Settings → LAN, Create VLAN 20 named Office.
(Optional) Config Legal DHCP Server, DHCP Option.
Select switch port 1~4 and add port tag, such as “Phone”, Click Next and Apply.
⑵ Navigate to Network Config → Network Settings → LAN, Create VLAN 21 named Phone.
Config QoS Queue to provides priority assurance, normally select Queue 7
Skip select ports and Apply. Then we have completed basic VLAN config for both VLAN20 and VLAN21.
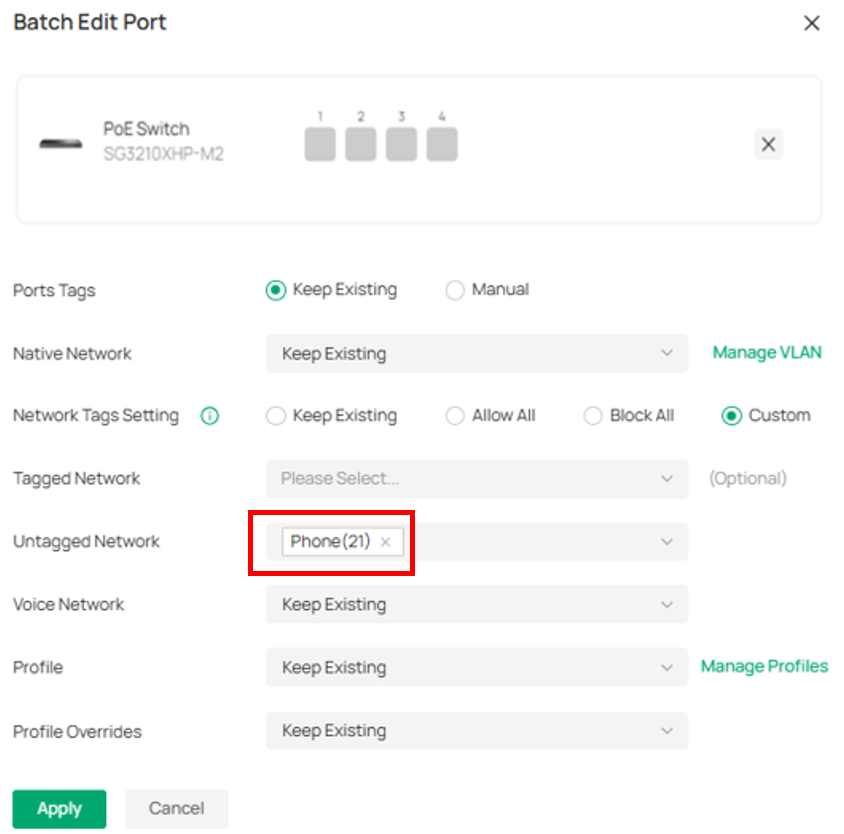
⑶ Config Voice Network. Navigate to Device Config → Switch → Switch Ports, Select “Phone” port and edit.
Config IP Phone VLAN to port. Edit Untagged Network to “Phone(21)” and Apply.
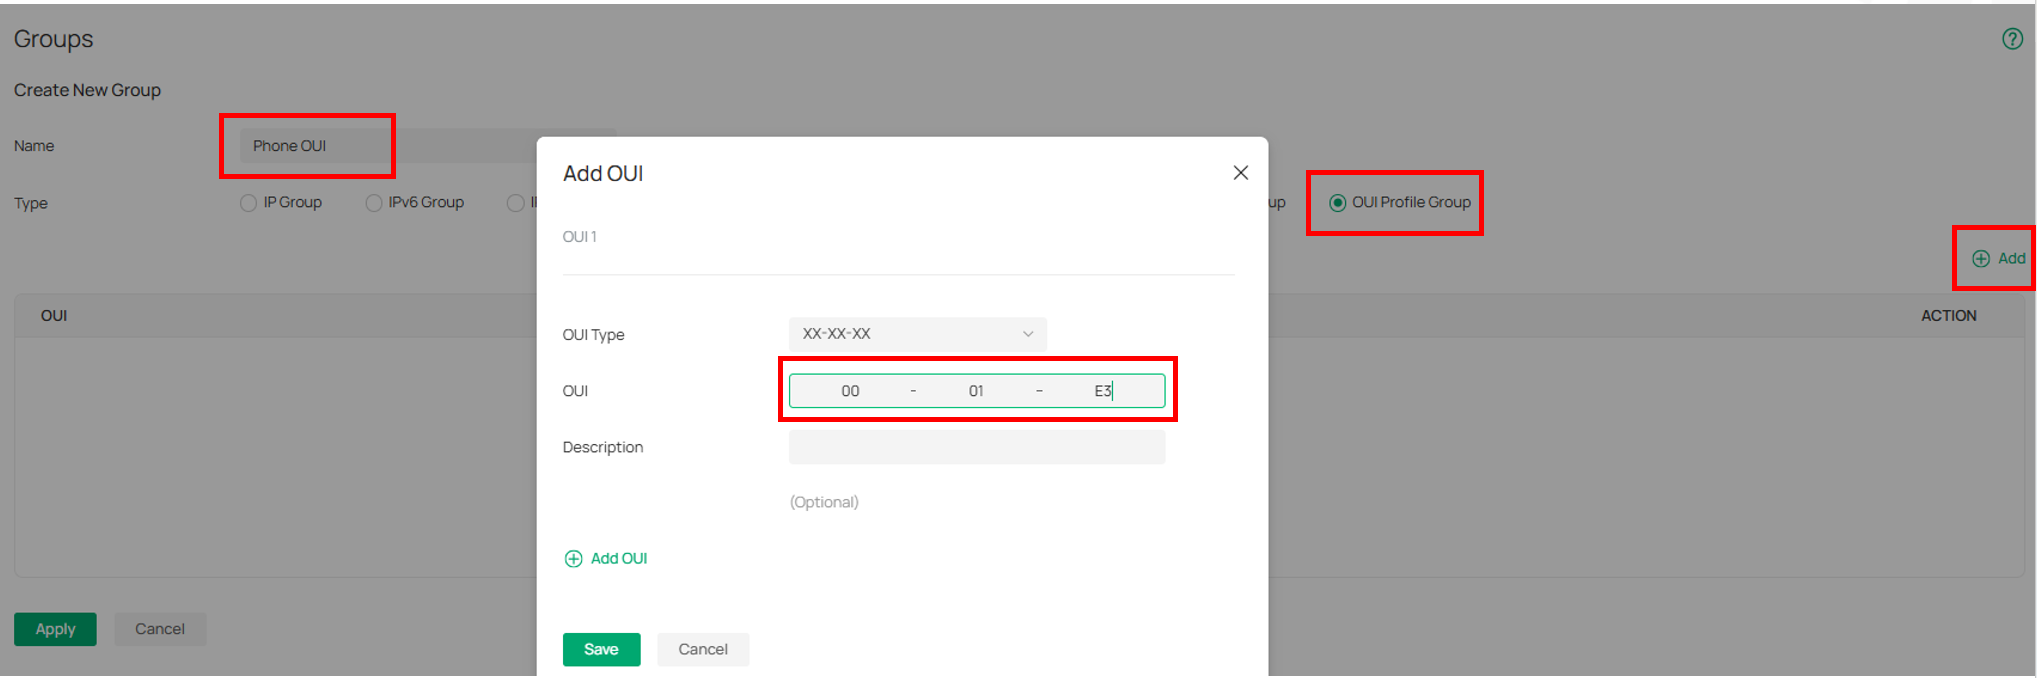
⑷ Config OUI Based VLAN. Navigate to Network Config → Profile → Groups, Create OUI Profile Group.
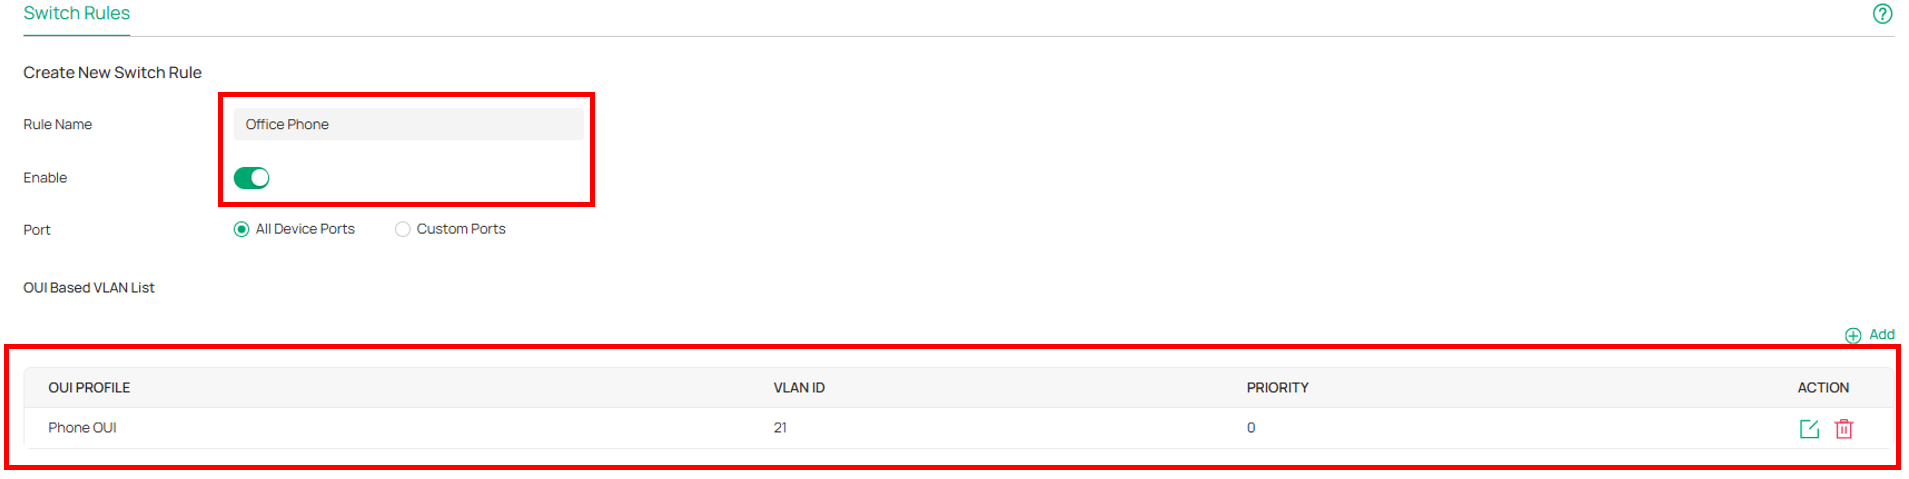
Navigate to Network Config → Transmission → OUI based VLAN → Create New Switch Rules, to create OUI Based VLAN Rule. (We have configured QoS, the priority field here can be configured with any value. Also, we bind the rule to all device ports, you can also bind it to custom ports.)
⑸ (Optional) Config Gateway——only necessary when the customer's voice traffic passes through the gateway.
Navigate to Device, pick up gateway, go to Manage Device → Config → Transmission → Gateway QoS → VoIP Prioritization, Enable the first priority for VoIP SIP/RTP.