Achieving Reliable IPTV Services on Your Router
 TP_TechWriter


Achieving Reliable IPTV Services on Your Router
Nowadays more and more households are enjoying diverse IPTV services such as live or time-shifted media. As you continue to add more smart home devices, you may have already discovered your router getting overwhelmed, which leads to buffering.
While most internet service provides (ISPs) provide a router as part of their service package, households with demanding needs and lots of devices may find the average router a little lacking. A basic router won’t get the job done. Why not upgrade to a router which can handle your bandwidth needs and provide you with IPTV services simultaneously?
TP-Link provides a wide array of routers up to the task to provide both reliable IPTV services and high-performance networks. To achieve reliable IPTV services on your TP-Link router, follow the steps below:
Configure IPTV on Your Router
Note: If you have already have internet access with normal IPTV services by default, do not follow the instructions below. Just keep the default settings on the IPTV page.
Log into the web-based interface of your router and go to the IPTV webpage. Then follow the instructions to configure IPTV. The web interface may be different on your router.
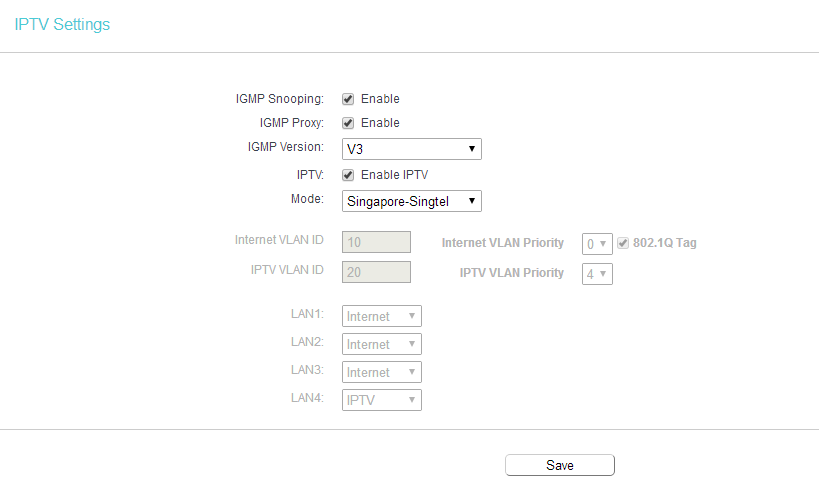
- IGMP Settings
Keep the IGMP Snooping, IGMP Proxy, and IGMP version as default, unless your ISP specified modifying.
- IPTV Modes
Enable IPTV and select the appropriate Mode according to your ISP. There are many modes available in the IPTV settings, such as Bridge, Singapore-ExStream, Malaysia-Unifi, Malaysia-Maxis, and Custom. These modes are designed for different ISPs, so you need to select the appropriate mode according to your ISP.

- Modes with country prefix like Singapore-ExStream, Malaysia-Unifi, and Malaysia-Maxis are designed for specific ISPs in certain countries. Just select the mode according to your ISP, you won’t need to type in any more information. Just save and complete the configuration.
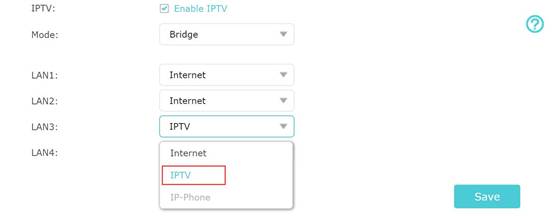
- Bridge mode doesn’t need you to type in VLAN information. Use this mode when your ISP doesn’t require VLAN settings, or you can’t figure out the VLAN ID. Follow the steps below to complete the settings:
- Select the mode as Bridge. Then select one LAN port for IPTV service and save. Here LAN3 is selected for IPTV service as an example.
- Connect STB to LAN3 and try the IPTV service.
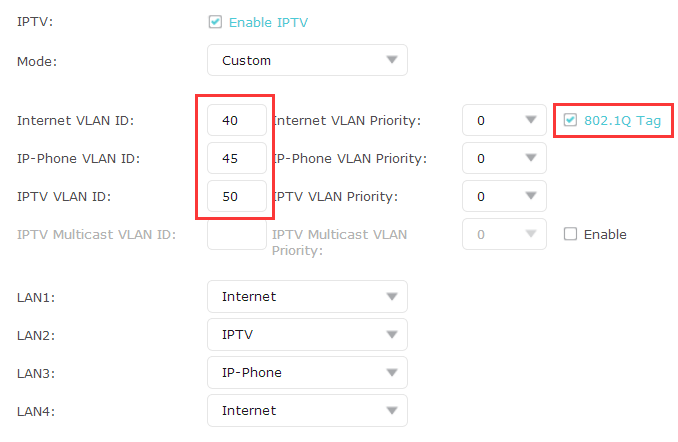
- Custom mode is used for some ISPs which require 802.1Q VLAN settings for IPTV service. If your ISP is not on the list and needs VLAN settings, you can select Custom mode and type in the detailed parameters manually. Remember to confirm the information with your ISP first. Follow the steps below to complete the settings:
- Select the mode as Custom. Then type in the VLAN ID provided by your ISP for different services. For example, if your ISP told you that they use VLAN 40 for internet service, VLAN 45 for VoIP and VLAN 50 for IPTV, type in the parameters as they provide.
- The 802.1Q Tag and IPTV Multicast VLAN ID are up to your ISP (Normally the 802.1Q Tag should be checked). Leave the VLAN Priority blank.
- Set LAN ports for different services. For example, select LAN1 and LAN4 for internet service, LAN2 for VOIP service, and LAN3 for IPTV. Remember to click “Save” after the settings.
- Connect your computers to LAN 1 and LAN4 for internet access, connect IP Phone to LAN2 for VOIP, and connect STB to LAN3 to watch IPTV.
Done!
Your IPTV setup is now done! You may need to configure your set-top box before enjoying your TV.
To know more details about IPTV and configuration of your router, go to the Download Center to download the manual of your products.