How to Add Omada Devices to a Cloud Based Controller
The Omada Cloud-Based Controller (CBC) provides centralized cloud management of routers, switches, and access points from a single interface. Because the controller is in the cloud, you can manage your network from anywhere, at any time, as long as the devices have Internet connectivity. There is no hardware or software maintenance required to use the Cloud Controller, ensuring your network's uptime meets enterprise standards. However, there is a small per-device license cost.
This article will show how to manage devices in a basic network.
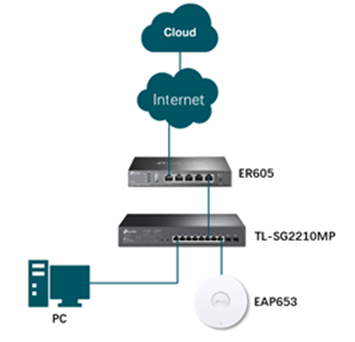
Example Network Topology
How to use the Cloud-Based Controller
Initial Controller Setup
1. Create a TP-Link ID and register a Cloud-Based Controller
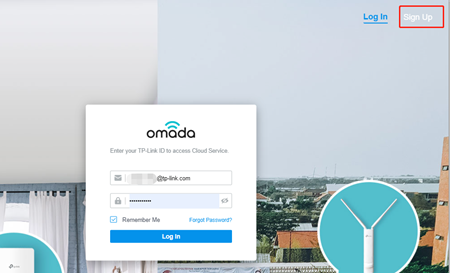
Navigate to omada.tplinkcloud.com in the browser to access the Omada Cloud website on your computer. If you already have a TP-Link ID, enter the TP-Link ID and password to log in directly. Otherwise, click Sign Up in the top right corner of the page to register a TP-Link ID, then log in with the TP-Link ID you have registered.
2. Click on Add Controller.

3. Click on Register to create a new CBC.

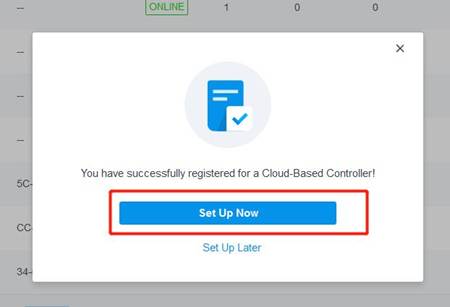
4. Click on Set Up Now to start configuring the CBC.
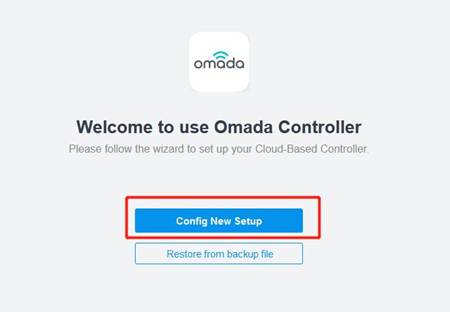
5. Click on Config New Setup.
6. Set up the Controller Name, Country/Region, and Timezone, check the Terms box, then click on Next. In this example:
Controller Name: Cloud-based Controller
Controller Country/Region: United States
Controller Timezone: UTC

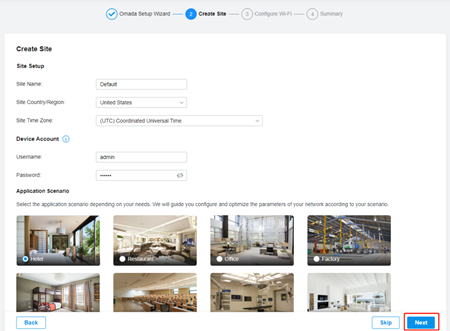
7. Set up a new site for the devices, in this example:
Site Name: Default
Site Country/Region: United States
Site Time Zone: UTC
Username: admin
Password: tplink
Application: Hotel
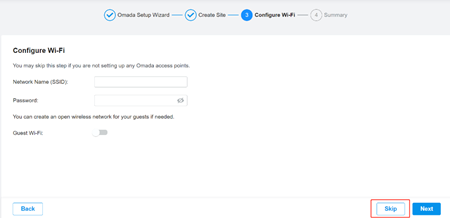
8. (Optional) You may configure Wi-Fi settings from here if you have EAPs to set up. Otherwise, click Skip.
9. Click on the Finish button to finish the Controller pre-configuration.

Adding Devices to your Controller
Here we introduce three methods to add devices:
- Add devices via Serial Number
- Add devices via Omada Discovery Utility
- Add devices via Management Webpage
Method 1: Adding devices via Serial Number (S/N)
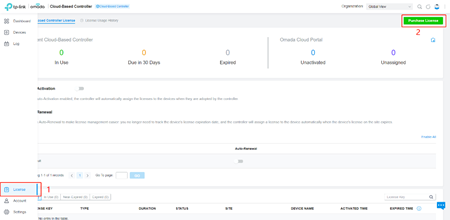
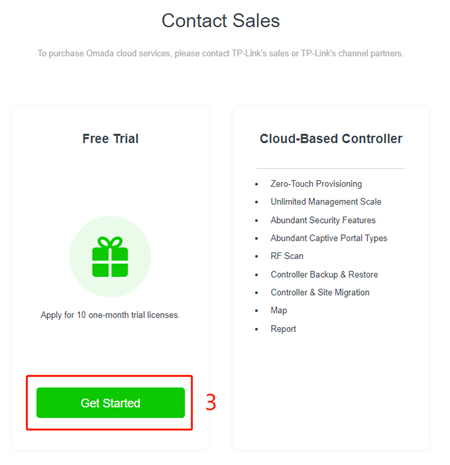
Note: Before adding the devices in CBC via S/N, you should make sure there are enough licenses in your account. If you don’t have licenses, you can go to Global View > License, and click on Purchase License to apply for 10 one-month trial licenses.
Omada devices can be added to CBC via S/N even when they are not connected to the Internet. When the devices are offline, they will be shown as the "PRECONFIGURED" status when added to the cloud controller. This will change once they are able to connect to the internet and grab their connection from the CBC.
Once a switch or EAP is connected to the Internet, it will automatically connect to the Cloud to check for any new configurations. If it is able to reach the cloud, its status will change to "UNACTIVATED". This means you must now assign an available license to add it to your network.
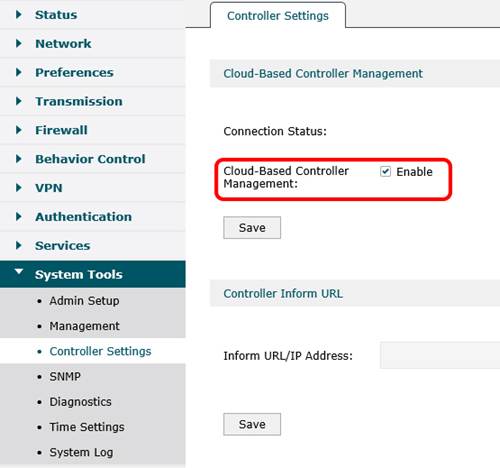
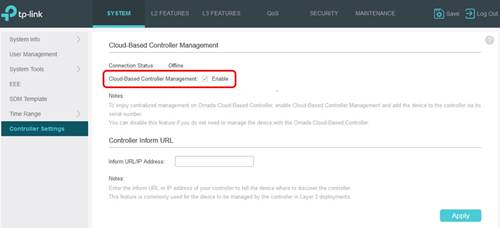
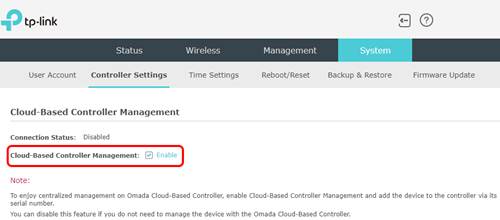
For gateways, usually, they must be configured in Standalone mode to access the Internet. In this case, you should enable the "Cloud-Based Controller Management" feature in the router’s standalone management page. Once this is completed, the router will be able to check for its cloud configuration and be registered on the Controller.
If you would like to adopt a switch or EAP that has already been configured in standalone mode, you must also enable the "Cloud-Based Controller Management" feature in the device’s standalone management page.
- Omada Gateway:
- Omada Switch:
- Omada EAP:
Add devices that have an Internet Connection
1. Click the site name on the Global Dashboard to enter the site management page.
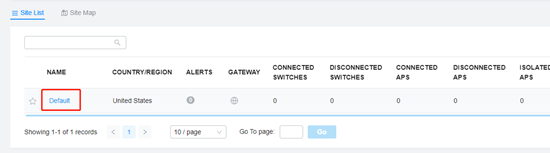
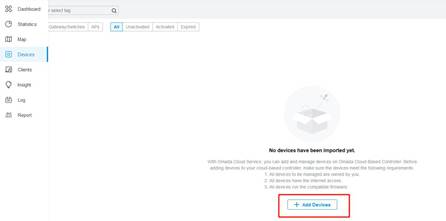
2. Go to the Devices list and click on Add Devices.

3. Select Manually Add mode, then add the devices' S/N manually, and Click on Confirm Button.
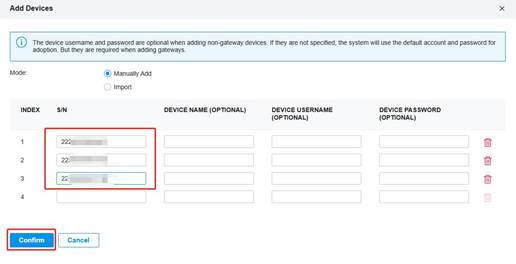
Note: You can also select "Import" mode, download the template and fill in your devices' information, then import the file. This mode is suitable for adding numerous devices in bulk.
4. If prompted, enter the verification code to pass the Security Verification.

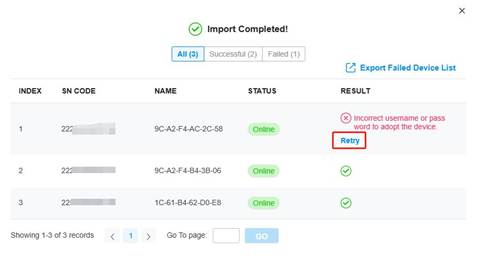
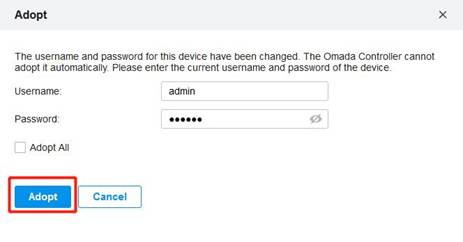
5. If the device has not been factory reset or already has a configuration, the error message "Incorrect username or password to adopt the device" will appear. Click Retry, then enter the username and password that were set up in standalone mode. If you do not know this, the device will need to be factory reset.
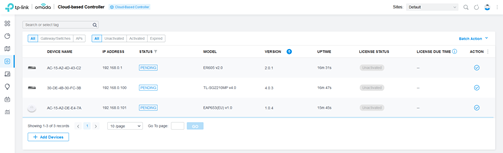
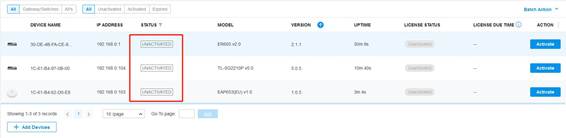
6. You should now see the devices appear in the Devices list with the "UNACTIVATED" status. If using Omada Cloud/Central Standard, you must grant each device a license before you are able to manage it in the controller. Click the Activate button.
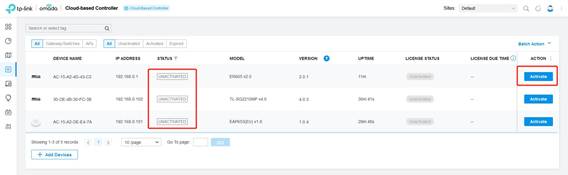
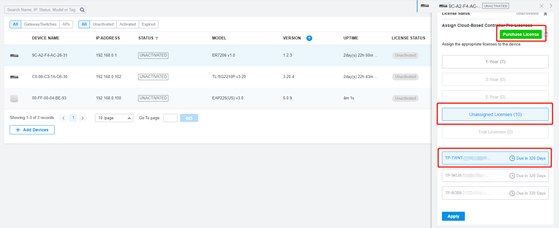
7. Select a license you want for the device, then click Apply to assign this license to it.
Note: Licenses that have never been assigned before will be sorted into the corresponding time groups. Licenses that were previously assigned then unbound will be sorted into Unassigned Licenses. A license can be unbound and reassigned multiple times depending on the length of the active period of the license.
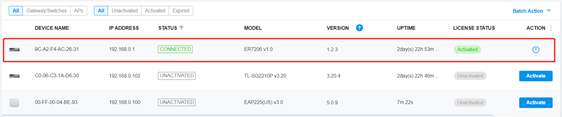
8. After assigning a license, the device status will go from PENDING to ADOPTING and finally to CONNECTED. The license status will now show as "Activated".
Add devices that do not have an Internet Connection
1. Reset the devices to factory default.
2. Go to the Devices List of the Controller, and click on Add Devices.
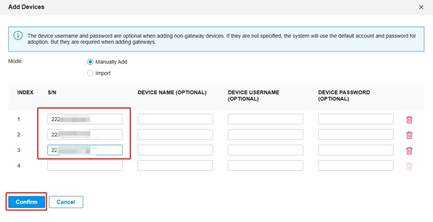
3. Select Manually Add mode, then enter the S/N of each device in the respective column. You may also add a name for the device. Click on Confirm once completed.
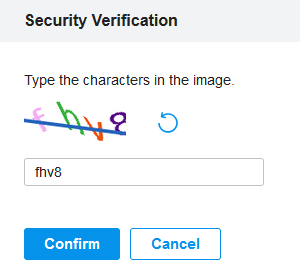
4. If prompted, enter the verification code to pass the Security Verification.
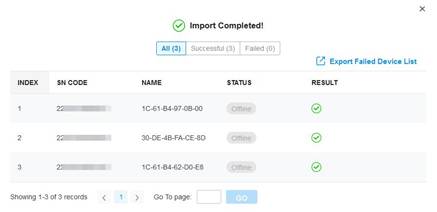
5. Wait for the devices to import. Once imported successfully, the device status will show as “Offline”.
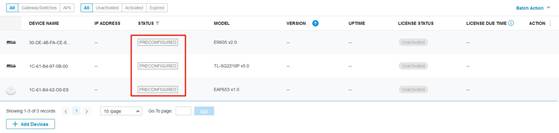
6. The devices will appear in the CBC Devices list with "PRECONFIGURED" status.
7. Once the devices are connected to the internet, the status will change from “OFFLINE” to “UNACTIVATED”.
Method 2: Add devices via Omada Discovery Utility
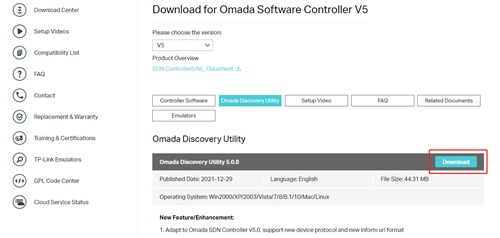
1. Download the zip file of the Omada Discovery Utility on the official website and unzip it on PC2.
2. Double-click the .bat file, "start-omada-discovery-utility", to run the Utility.

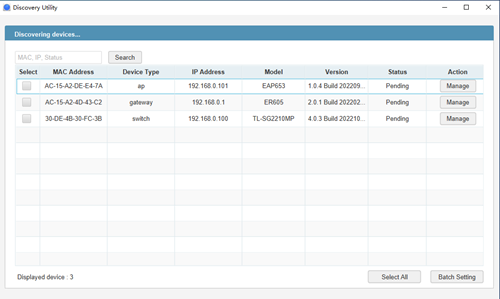
3. The Discovery Utility can automatically discover devices on the same network as your computer and display them in a list.
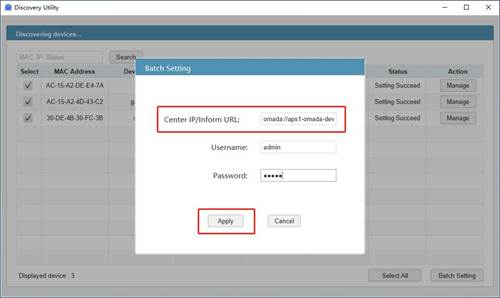
4. Log in to Omada Cloud on your PC, click on the CBC you have created, and go to Details to copy the Inform URL.

5. Select all devices and click on Batch Setting in the Utility on PC2. Paste the URL you just copied as the Center IP/Inform URL and enter the username and password of the devices. Once completed, click the Apply button.
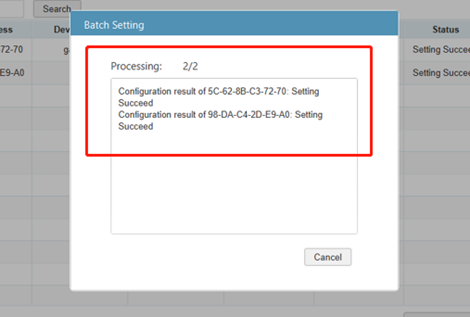
6. After a brief period, the devices will appear in the CBC Devices list with the status as "PENDING”. You can now adopt and activate them through the controller.

Method 3: Add devices via Management Webpage
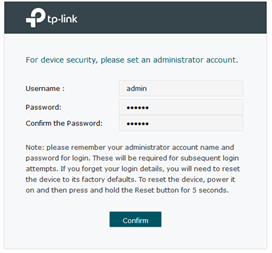
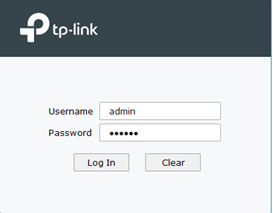
1. Enter the IP of the device you wish to adopt in a web browser. If not completed already, set a new username and password, then log in with those credentials.
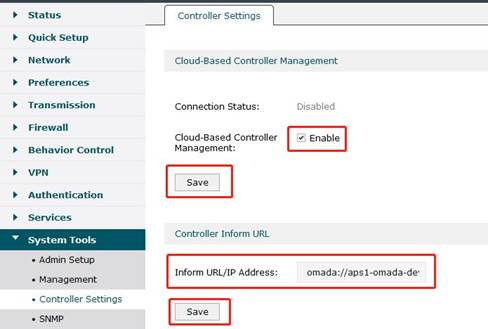
2. Go to System Tools > Controller Settings, check the box to enable "Cloud-Based Controller Management". In a new tab, log in to the Omada Cloud, click on your controller, and go to Details to copy the Inform URL. Then, on the web management page of the device, under Controller Inform URL, paste the Inform URL from your controller.
3. Complete the same steps for any other devices you wish to adopt, then navigate to the Devices list on your controller. The devices should show up with their status as PENDING. You can now adopt the devices and assign licenses to manage them through the controller.