Changing Your Web Login Credentials
Note:
- It will be assumed you have already logged into your TP-Link device's web management UI.
- Web management UI is varied by model.
- No web management UI is required for SOHO Switches and Adapters.
- Routers that are linked with your TP-Link Cloud ID will use the Cloud ID email and password.
Please choose the category of your device in the table below.
Link here to find the correct product category of your model.
|
|
||
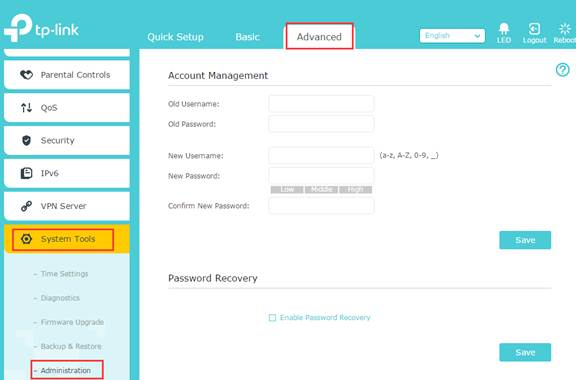
Example A:
Go to Advanced > System Tools > Administration and complete the settings in the Account Management section. Enter the old username and old password. Enter the new username and enter the new password twice (both case-sensitive). Click Save. Use the new username and password for the following logins.

Example B:
Click on System Tools > Password on the left panel. You will be then prompted to change your login information. Press Save. The system will send you back to the login screen. Use the new username and password for the following logins.
Example A:
Go to Maintenance > Administration, create your own login password, click Save. Use the new password for the following logins.

Example B:
Go to System Tools > Manage Control, enter the old password, then create a new user name and password and confirm it. Click Save. Use the new username and password for the following logins.

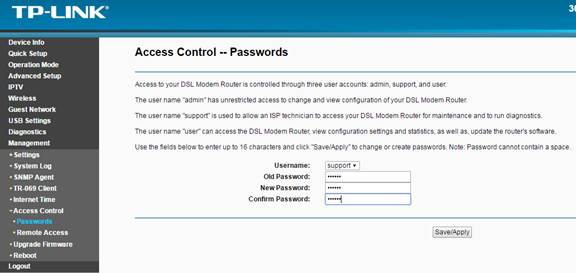
Example C:
Click on Management > Access Control > Passwords. Choose your user account, enter the old password, then fill in a new password and confirm it. Click Save/Apply.
Example D:
Go to Advanced > System Tools > Administration, enter the old password, enter the new password and enter again to confirm. Click Save to make the settings effective. Use the new password for the following logins.

Example E:
Go to Status > Security. Enter the current password. Set a new password. Enter again to confirm. Click Apply.

Example F:
Click on System Tools > Password. Enter the old user name and password. Set a new user name and password. Enter the new password again to confirm. Click Save.

Example G:
Go to Management > User Management. Select your username as admin or user. Enter the old password. Set a new password. Enter the new password again to confirm it. Click Save.

Example A:
Click on Settings > System Tools > Admin Account. Enter the old password. Enter the new password. Click Save.

Example B:
Go to System Tools > Password. Enter the old user name and password. Enter the new user name and password. Enter the new password again to confirm it. Click Save.

Example C:
Go to Advanced > System Tools > Account Management. Enter the current username and password. Enter the new username and password. Click Save.

For Smart Home (TL-NCXXX Cloud Cameras)
Click the System > Account. On this page, you can change the administrator’s password and manage the user account(s) that are allowed to access to your camera.
Click Change Password to change the password of the admin account which has all authority of configuration, or user accounts that can only view the Live View. Enter the old password and the new password. Click Save.
To add a new user account, click Add, enter the new user name and password. Click Save.

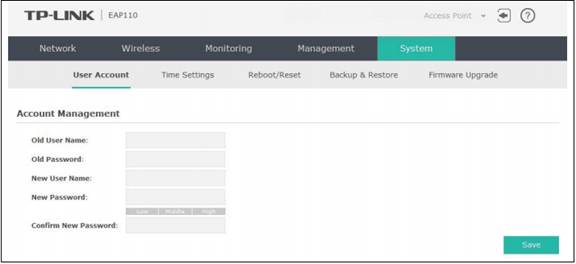
Example A:
Go to Advanced > System Tools > Modify Password. Enter the old user name and password. Enter the new user name and password. Enter the new password to confirm. Click Save.

Example B:
Go to Advanced > Device > Account Management. Enter the old user name and password. Enter the new user name and password. Enter the new password to confirm. Click Save.

For Accessories (Print Servers)
Click Setup > System. Enter the administrator’s password. Click Save & Restart.

Example A:
Go to System > User Management > User Config.
To create a user:
User Name: Create a name for users’ login.
Access Level: Select the access level to login. Admin: Admin can edit, modify and view all the settings of different functions. Guest: Guest only can view the settings without the right to edit and modify.
User Status: Select Enable/Disable the user configuration.
Password: Type a password for users’ login.
Confirm Password: Retype the password.

To edit a user:
Click Edit button of the user. Tick Password Modify. Enter the old password. Set a new password. Click Apply.

Example B:
Choose the menu System > User Account to load the following page. Enter the old password. Enter the new password. Enter the new password again to confirm. Click Apply.

Example A:
Go to System > User Account. Enter the present user name and password of the admin account to get the permission of modification. Enter a new user name and password. Enter the new password again to confirm. Click Save.
Example B:
Go to System page. Enter the current user name and password. Enter a new user name and password for the admin account. Confirm the new password. Click OK.

Example C:
Click System Tools > Account. Enter the old password. Set a new user name and password. Confirm the new password. Click Save.

Example A:
Go to System Tools > Password. Enter the old user name and password. Enter a new user name and password. Confirm the new password. Click Save.

Example B:
Go to System page. Under User Account, enter the current password. Enter a new user name and password. Click Apply.

Example A:
Choose menu System Tools > Password. Enter the old user name and password. Enter a new user name and password. Enter the new password twice to confirm it. Click Save.

Example B:
Choose the menu Maintenance > Admin Setup > Administrator to load the following page. Enter the current user name and password. Enter a new user name and password. Enter the new password twice to confirm it. Click Save.
