Changing Your DNS Settings

Released On: 2019-07-10 16:45:56Last update time: 2023-12-01 17:42:47

In certain network environments, users may need to configure a particular DNS address for their network. This article aims to guide you to change the DNS server settings on your Deco system.


Before configuring the DNS:

1. Have the latest Deco app installed on your smart phone by visiting the app store to check.

2. Make sure your smart phone is connected to Deco's Wi-Fi network.

3. Close the Deco App if it is already running in the background.

4. Re-launch the Deco App.

Please note: Only when your mobile phone is connected to Deco's Wi-Fi network, can you change the DNS settings through the Deco app. Forcing the Deco app to close in the background and re-launch it again aims to clear the app cache.


Changing the DNS server settings

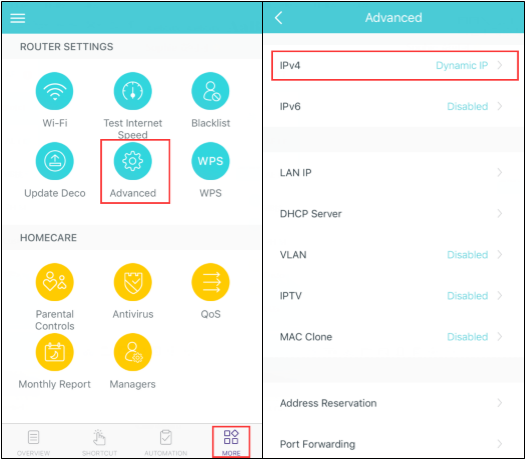
1. Tap “More” on the bottom right corner, then click on “Advanced” -> “IPv4”.

https://static.tp-link.com/image001_1559618807026u.png

2. Tap “Internet Connection Type”, toggle off "Obtain DNS Automatically" and type in your preferred DNS server settings.

https://static.tp-link.com/image002_1559618819416i.png


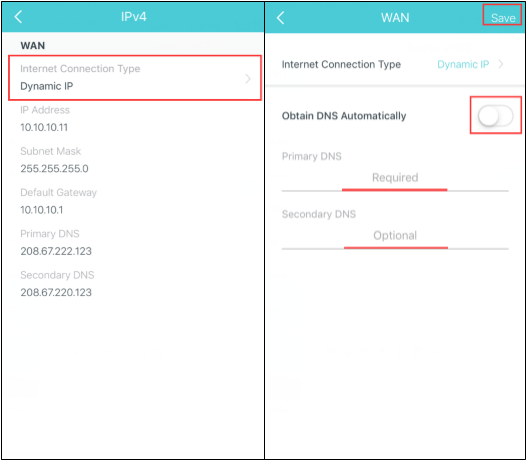
3. Click “Save” and the new DNS settings will take effect automatically.


0
Comment

So, if your DNS is not working you can't change it to another DNS because ... well .. your not working DNS is not working.


This is by far the most ridiculous design I've seen in my life.   You can't fix a broken network until it is not broken.


Only primary dns in router 8.8.8.8


ONLY primary dns in deco dhcp

192.168.1.1 or router ip.


ONLY primary dns in deco ipv4 

192.168.1.1 or router ip.


Works faster

It is frustrating to not be able to change settings unless my Deco app is connected to the WiFi network I am managing. Thus, for example, I can't make changes on my parents' Deco network which I manage remotely. 

This was a very odd procedure.


Please can you make sure all settings available from the mobile app is also possible to change in the web interface? I find it much preferable and far easier to do from a PC. I was looking at how to change the DNS server from tplinkdeco.net, but it seems not possible and had to search this forum to find out, because I couldn't  figure it out in the mobile app either.


The reason why I want to change DNS is to use Adguard DNS on the Deco router.


I still can't change it, even when I am connected to the wifi network.


Deco M5 - 1.5.3 Build 20210203 Rel. 68223 - Android app


Now what?

I can change the DNS values and it displays them in the Deco app and the Deco admin web page. However, the clients all still get the original DNS server values from the Deco router. Yes, I have rebooted everything many times as this has been going on for at least 6 months (I just posted a question to this forum about it).

Tp-Link routers are probably now past their useful life.
Changing WPA settings to remove the ipad privacy warning was the only reason for purchasing the TP-Link but this has now proved to be a fools errand.
There are no simple instructions below PhD level.
192.168.1.1 (and other options) can no longer be accessed from an Ipad working on a TP-Link device, or these sites are unworkable unless all security is removed it seems?
And the web or app facilities provide zero utility re WPA settings; the website offers only circular links leading to no actual solution.
Time to find a more secure and user-friendly WiFi system!

How do you know if it works 

Along these lines....


I'm hosting my own DNS on a PiHole.


So, the DHCP on my Deco (x68 / W7200) hands out the LAN-based DNS server as primary and OpenDNS as secondary.  Very good.


The Deco ipv4 doesn't let me point to a LAN IP for DNS (???) so I have to just point it to OpenDNS so I can still do some filtering (almost entirely the 10's of thousands of requests to  ast.safethings.avira.com by the way...stop the nonsense, TP-LINK !!!).


Anyway, in this config, from reviewing logs, it would appear that all my LAN traffic (minus the Deco itself) first requests DNS resolution from the local server, then they go out and do it again directly from Open DNS.


How can I avoid double name resolution, if that is indeed what is happening.


If I set DHCP to just the one local DNS server and my Pi fails for any reason, all LAN clients would be stuck.  That seems bad.


If I set DHCP to use the AT&T router as second DNS, then is it quering the router for name resoltion, or just forwarding the already resolved lookups directly out to the internet?


Thanks,

Jon

To change the DNS settings with Control Panel, use these steps:

  • Open Control Panel.
  • Click on Network and Internet.
  • Click on Network and Sharing Center.
  • Click the Change adapter settings option in the left pane.
  • Change adapter settings
  • Source: Windows Central
  • Right-click the active network interface and select the Properties option.Quick tip: You'll know which adapter is connected to the network because it won't have a "Disabled" or "Network cable unplugged" label.
  • Network adapter properties option
  • Source: Windows Central 
  • Select and check the Internet Protocol Version 4 option.
  • Static DNS configuration network settings
  • Source: Windows Central 
  • Click the Properties button.
  • Select the Use the following DNS server addresses option.Quick note: When you select the option to specify the DNS settings manually, the computer will continue to receive the TCP/IP address from the DHCP server (router).
  • Under the "Preferred DNS server" section, confirm the primary DNS address.If you want to use Cloudflare, Google Public DNS, or Cisco OpenDNS, you can use these settings:
  • Change preferred and alternate DNS addresses
  • Source: Windows Central 
  • Under the "Alternate DNS server" section, confirm the secondary DNS address the system will use if the primary is not reachable.You can use one of the secondary addresses from these companies:
  • Click the Advanced button.
  • Click the DNS tab.
  • Click the Add button.
  • Specify additional alternate DNS server addresses.
  • Windows 10 DNS multiple addresses
  • Source: Windows Central 
  • Click the Add button.
  • Click the OK button.
  • Click the Close button.


Once you complete the steps, the computer will immediately start using the specified DNS settings.


Greeting,

Rachel Gomez

12
upload
    upload