Troubleshooting What to do if the Detection feature is not working on the TP-Link Camera?

Overview
The detection feature in a camera is a capability that allows it to identify and capture changes in the environment, such as a person walking by, a vehicle passing, or any alteration within its field of view. Once motion is detected, the camera can trigger various actions based on your settings, such as sending an alert or notification, recording video footage, and more.
There are two main detection types. The first employs pixel changes and AI motion algorithms to detect motion, primarily used by most cameras powered through an adapter. The second type, known as PIR motion sensors, activates alerts by sensing body heat and infrared energy. Battery-powered cameras often integrate an additional motion sensor, which, upon detecting a change in heat, activates the camera and further utilizes AI algorithms for recognition.
The detection issue is typically associated with the installation and configuration of the camera, which involves adjusting the sensitivity settings within the app and configuring the detection areas. If the detection feature is not set up correctly in the app, it may not function as intended. Nevertheless, other factors, such as the camera's installation location, height, and angle of view, can also contribute to this issue.
If the detection feature of your TP-Link camera is not working, consider the following suggestions.
Part 1. For the cameras powered by a power adapter or electric wires
1. Ensure that the camera's firmware and our app are both up to date.
- You can uninstall the TP-Link app on your phone and then go to the App Store (iOS) or Google Play (Android) to download and install the latest version.
- Refer to the instructions below to update the camera's firmware on our app or ensure its firmware is up to date.
How to update the firmware of the Tapo&Kasa devices on the Tapo App
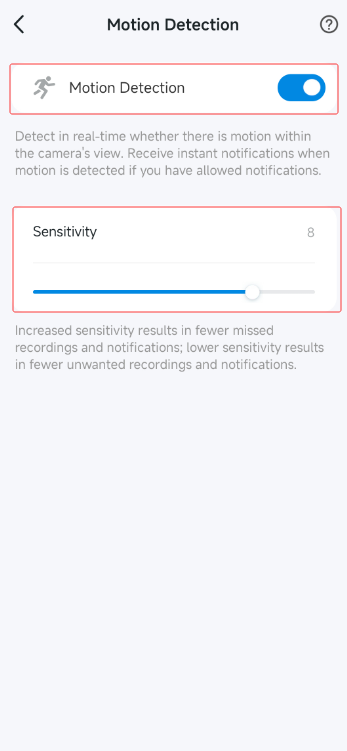
2. Ensure the Detection Types and Sensitivity values are enabled as desired.
Here, we take Tapo C225 as an example.
Go to the camera's Live View > Device Settings > Detection page, enable the desired detection types and set the sensitivity value accordingly.
Note: Different camera models have different detection types.
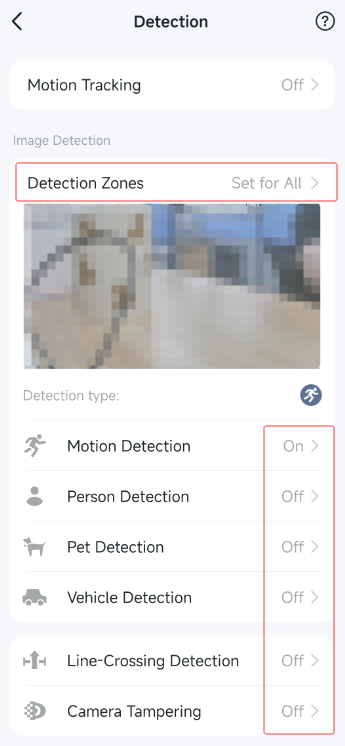
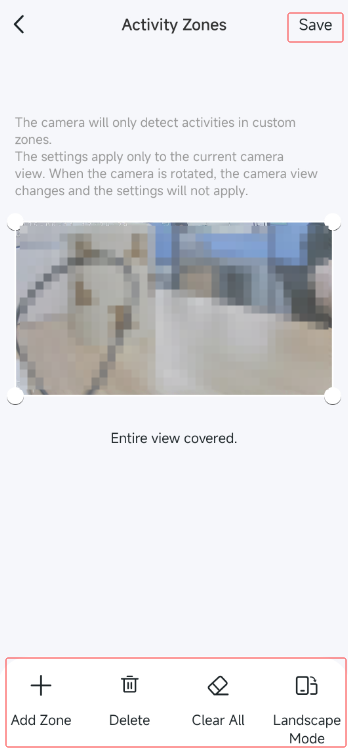
3. Adjust the suitable Detection Zones.
On the camera's Detection page, tap Detection Zones and set suitable zones.

4. Avoid placing the camera facing glass or windows.
If the camera is placed facing glass or windows, it may produce blurry images at night due to the reflection of infrared light, which can cause the detection function to be inaccurate or fail, as the camera relies on algorithms that identify changes in pixel data to recognize events.
Part 2. For the battery-powered cameras
To conserve power, battery-powered cameras typically remain in a low-power sleep state and can only detect motion when awake. The camera can be awakened by actions within the app, such as viewing the camera's live feed, or by the PIR sensor. Below are some suggestions if you're experiencing detection issues.
1. Adjust PIR Sensor Sensitivity
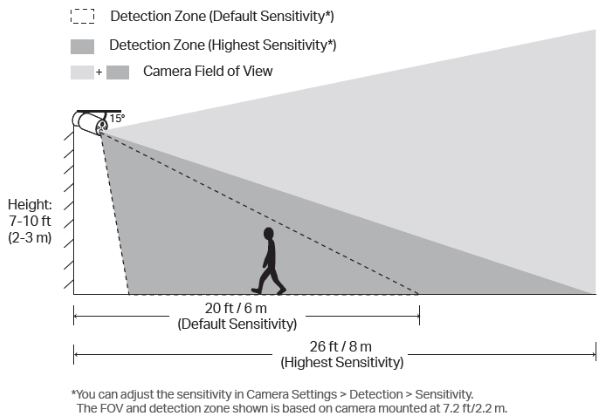
The detection range of the battery-powered camera is up to 8-9 meters. You can access the camera's Device Settings > Detection > Wake-up Sensitivity page to change the Sensitivity value to adjust the detection range.
What is the Wake-up Sensitivity of my battery camera/doorbell?
2. Optimize the Mounting position
The mounting location also significantly affects the detection range. You could first test the detection range by referring to the instructions below.
Detection Range Test: test the activity detection zone of the Tapo Battery Camera
Please try the following methods to improve the detection range if it's not ideal.
1) Adjust the height and angle.
Check the recommended mounting height and angle in the Tapo app > Camera's Device Settings > User Guide > Mounting Guide or the Quick Installation Guide.
Take C425/TC85 as an example: the recommended height is 2-3 meters, tilted down at an angle of 10°-15°.
2) Avoid placing the camera behind glass.
Situating the camera behind glass can prevent it from detecting movement outside, resulting in missed alerts.
3) Keep the motion sensor lens level.
Ensure the camera lens is horizontal. If tilted or inverted, the PIR sensor's detection range may be limited, leading to missed motion events.
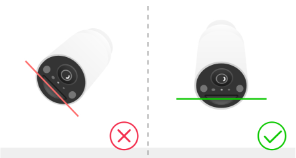
4) Don't mount upside down.
Ensure the camera is oriented correctly to maintain proper functionality.
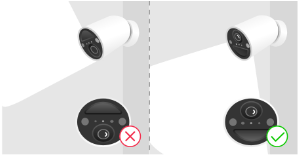
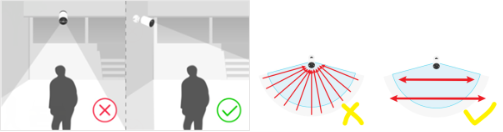
5) Mount the camera to the side.
Avoid pointing the camera directly at the monitoring area. When someone approaches directly, the PIR sensor may not activate effectively. Position the camera to the side for better sensitivity.
3. Check the camera's firmware version
Ensure that the camera's firmware is up to date.
4. Verify Detection Types and Detection Zones
Go to the camera's Device Settings > Detection page, enable the desired Detection types and set the Detection Zones accordingly.
5. Modify Detection Sensitivity
Adjust the Detection Sensitivity value on the camera's Device Settings > Detection > enabled Detection types page.
6. Adjust the Clip Settings
Navigate to the camera's Device Settings > Storage & Recording > Clip Settings page, reduce the Retrigger Time, increase the Record Buffer, and extend the Maximum Clip Length.
More Articles:
Detection Range Test: test the activity detection zone of the Tapo Battery Camera
How to use the Detection function of the Tapo & Kasa cameras?
Introduction to Motion Tracking and Auto tracking feature
